Pre-buy examinations

Great News! While I didn’t learn how to play a musical instrument during COVID, I did take the time to write a book on Pre-buys for Amateur-Built aircraft. I haven’t been able to travel commercially during the this time, so I came up with the next best thing. Anyone should now be able to perform a high-quality pre-purchase examination of an amateur-built aircraft, either alone or with your inspector, with the book in hand. It’s 12 chapters long, spiral-bound, on glossy, high-quality paper, with over 200 color pictures, a checklist, and hints for both the seller and buyer. It is the culmination of over 13 years of inspecting thousands of amateur-built aircraft. With the cost of the average pre-buy averaging $1500 (including travel), this book is a huge value. For those of you who currently own or have built an amateur-built aircraft, you will be able to use it yourself to inspect your aircraft, or give it to your mechanic. 
Purchase it here: https://baselegaviation.com/store/

Pre-buys, Pre-Sales, and Consultation on Amateur Built Aircraft 

Contact Vic by email: vicsyracuse@gmail.com

Many times a pilot buying an Amateur-built aircraft isn’t certain of what to look for. Fancy paint jobs can hide damage or poor construction. Between my building, flying, and DAR experiences we can help you decide what is right for you and what potential problems you may see with a particular aircraft, whether they are maintenance/safety issues, flying qualities, or even supportability problems.

Please do not get emotionally attached to the airplane until we have completed the pre-buy examination. 

A surpisingly large portion of the airplanes for sale will not pass a pre-buy examination. We have performed hundreds of these examinations over the years and can help you make an informed purchasing decision. 

We are recognized as the go-to for pre-buys, especially on RV-type aircraft. We’ve traveled all over the USA (30 States) via airlines or RV-10. Every single customer will tell you it was worth it, and sellers have asked me to do their next pre-buy examination. Both the seller and the buyer win, as we will all understand the quality of the aircraft along with any potential safety items that need to be fixed.

It does appear that some types of airplanes are getting snapped up as soon as they are presented for sale. 

Don’t fall into that trap. There are gems, but be patient and together we will find the right aircraft for you.

All of our customers will tell you it is money very well spent.

As for RV’s, all of them really need a prebuy examination, especially the earlier models, the RV-3, RV-4, RV-6, RV-6A, and early RV-8’s, that were not prepunched . The later models such as the RV-7, RV-7A, RV-8, RV-8A, RV-9, RV-9A, RV-12, RV-10, RV-14, and RV-14A, were pre-punched, but still need to be checked for proper assembly and Service Bulletin compliance. All of them have some very critical areas requiring examination of proper building technique.

See Vic’s article on Pre-buy Inspections in  EAA Sport Aviation May 2022 issue below and the and KitPlanes April 2018. Both are at the end of this web page. He recently examined an RV-10 kit advertised as 95% complete. The riveting was so bad throughout the entire aircraft that it is a restoration project. The buyer dodged a big bullet on this one. Unfortunately, a first-time buyer purchased this kit a few months later without a prebuy examination. He got a second opinion, confirming the results. He was out $35K.

Consultation services

  • Call ahead so we can have discussions on exactly what you are looking for, including your pilot experience, your equipment needs, and types of aircraft you are interested in.

  • Together we will help you zero in on a few choices and then help determine how you should move forward.

Pre-buy Examination

  • Includes a list of items needing repair or actions recommended, either prior to purchase or at some time in the future. This examination is to help you make a purchasing decision.

  • We make these examinations a priority for the buyers and sellers so that I will not cause any delay in the sales process.

Pre-Sale Examinations

  • Have an airplane that you need to sell? Let us examine it and help you determine what might need fixing in order to command a fair market price. About 50% of the airplanes we examine end up not being bought due to the list of discrepancies discovered during the pre-buy process. Almost all of them are fixable, but it tends to delay or even sour the prospective buyer on the airplane. By getting this examination completed before you even list the aircraft you are way ahead of the game, and we will talk to any prospective buyer for you. It will certainly shorten the sales cycle for you, and perhaps even command a higher price. 

Testimonials:

You did a fantastic pre buy that saved me from buying an unsafe build 
and I am now in a different gorgeous RV7A happy as can be. 
Robert S. (Colorado) 

I’m still absolutely IN LOVE with the RV8 you helped me to buy and did the pre-buy on. Every time I go up I feel like there oughta be a law against someone having this much fun. Aerobatics, instrument flying, sightseeing in the mountains of the Pacific NW, trips with my wife, it’s impossible to have a bad time up there. Seth L (Washington)

I have called Vic many times over the last two years for advice and he has always willing and able to help me out. He is a master
at Advanced Flight Systems, The Garmin GPS systems, and avionics. Having built many RV’s and mastering incredible panels, he is the go to
person for advice.

I would highly recommend Vic’s services to anyone.

-John P. (South Carolina)

I recently sold my RV-10 aircraft.  As we all know an important aspect of any aircraft ownership change is the pre-buy inspection.

In my case the pre-buy inspection was done on behalf of the buyer by Vic Syracuse of Base Leg Aviation.  

Vic’s inspection of my aircraft was thorough, and efficiently completed.  The result of his work was instrumental in the sale being completed smoothly.
I believe the buyer is confident he is getting a good airplane and I am confident he is in good hands as he becomes safely acclimated to his new airplane.

I can without reservation recommend Vic to anyone looking for someone to complete a pre-buy inspection or any of the other many services offered by Base Leg Aviation.


This Article Appeared In Vic’s Checkpoints column in EAA Sport Aviation May 2022 Issue

The Value of a Good Prebuy

I’ve written many columns, and even a book, on prebuys. The common message I have put forth in each of them is that it is important to have the prebuy done by a person who is knowledgeable on the aircraft. A checklist is of paramount importance. If there’s not one available pertinent to the type, then try using FAR 43, Part D as a guideline. It’s important to not wing it, as I guarantee things will be missed. I am going to use this month’s column to help drive the point home.

I see about 250-300 different airplanes each year as part of my maintenance, DAR, and prebuy activities. Most of them are well-built and well-maintained by owners who have a real passion for aviation. However, there are times when I must remind myself that this is amateur-built and experimental aviation. Sometimes it is not at its finest.

The most recent and shocking example involved an RV-6A that was towed to our shop one evening after landing. I had been asked about doing a prebuy on it, but since it was in California, I declined, as I am not traveling commercially due to COVID. It was going to be the buyer’s first airplane. Being new to amateur-built aviation, he managed to find a DAR in California who was willing to do the prebuy inspection. Once that was completed, the aircraft was purchased sight-unseen, and the buyer found a local ferry pilot from Falcon field (KFFC) to bring it back with him from California. Falcon Field is located near Atlanta, so it would be a great cross-country trip to get some time in the aircraft.

Lest you think this column is just self-serving because I do prebuy inspections, you might want to sit down before you read the next sentence. The aircraft was towed to our hangar because the propeller departed the aircraft as it was in the flare for landing. I had left for the day, but my son, Nick, was still there. He remarked that he heard it making awful noises as it came down final, sounds that he had never heard from an airplane. He lost sight of the aircraft behind some trees as it touched down, but another customer saw the propeller depart the aircraft. Luckily, the ferry pilot immediately reduced the throttle and landed uneventfully. (Well, almost. The co-pilot’s left side brake didn’t work. It turns out the brake reservoir was empty.)

The story goes that they noticed vibrations at various rpms on the trip from California, but could get them to go away at 2400 rpms. This particular flight was the first flight after landing at KFFC. T the purpose of the training flight was to do some air work, including stalls. The new owner then planned to fly it home to Auburn, Al. During the stall series, the vibrations intensified, and the decision was made to head back to the field. That certainly ranks up there as one of the best decisions I’ve ever heard about!

I couldn’t wait to get back to the shop in the morning to investigate, all the while thinking about how lucky they had been on the trip home. There’s a lot of desolate terrain between California and Atlanta, not that the outcome really matters where the prop might come off. Surprisingly, the composite prop and spinner showed minor damage, and I was happy that the spinner was still attached, as it meant the bolts should still be there.

My initial thinking was that the prop bolts had not been properly torqued when it was installed. There is no logbook entry for the composite propeller installation. At some point we know there was a metal Sensenich propeller installed. Twenty hours prior to the sale there is a logbook entry stating that a Sam’s James cowl was installed, along with a metal propeller crush plate “for W&B.”

All of the prop bolts were inside the spinner. The safety wire had all been broken, and three of the bolts were sheered, with the remaining three all having been stripped of their threads. The aluminum spacer had severe fretting in multiple places, which is caused from the propeller being loose. The drive lugs on the spacer had “oblonged” the holes in the propeller. Clearly, this propeller had been loose for quite some time.

Careful inspection of the front of the propeller showed evidence of washer indentations into the propeller hub, indicating that the propeller had been installed at one time without a crush plate. Wooden and composite propellers require a crush plate! Keep in mind that a metal propeller had been removed, so there was no crush plate. I could also see that the forward spinner bulkhead was deformed from the bolts and washers, plus it was not an entirely flat bulkhead as is common on the RV’s. It had a little ridge on it, which I think came into play to set up the eventual failure.

The installed crush plate for “W&B” was central to the failure.  The problem here is that it was a 7” diameter crush plate, while the propeller needed a 6” crush plate. This 7” crush plate now sat on that ridge line I mentioned, keeping it slightly above the propeller. Even with proper torque applied to the mounting bolts, there was no way this crush plate was going to fit tight against the propeller hub and properly secure the propeller to the flange. After 30 hours, it all finally let go.

There’s a big lesson here for new owners, whether you built the airplane or not. Yes, one of the attractions to amateur-built aviation is that we get to do our own maintenance and modifications without a lot of oversight. But we must remind ourselves that that freedom also comes with responsibility. Some changes and modifications have the potential to cause severe injury or death, and perhaps it is wise to get some help or advice. Luckily, nobody got hurt here, but it is still going to be expensive, as Lycoming has a mandatory engine teardown for propeller separation. The teardown and rebuild, along with labor to remove and install will be close to $15K.

I also have some concern with the bolts that were used. They are F911 bolts, such as are used in the auto racing circuits. The shorter bolts holding the spacer to the engine flange look to be of high quality F911 bolts. The longer propeller bolts look to be cheap, even though they are stamped quite poorly with the F911 logo, and the plating is of a different color and is flaking off. There is some noise out there that there are bogus F911 bolts being made from China. Propeller bolts usually have rolled threads, not cut threads. Rolled threads are much stronger, up to 35%. Look at the picture and judge for yourself.

But the story doesn’t end there. I also had a chance to look a little closer at the whole aircraft. It clearly isn’t a show plane, but not all of them are, and there’s no problem with that. It’s what’s under the covers that counts. In this case, some of the findings were alarming, and should not have been missed on the prebuy. One intake tube had such a horrible leak that blue fuel stains were running down the intake tube and onto the valve cover drainback tube. Other intake gaskets were quite brittle.

The oil had not been changed in over 7 months. An unsecured, cheap, rubber coozy was used between the cowling and the engine intake, which fell off when the cowling was removed. All the engine controls were mounted to engine mount tubes rather than to the engine!!! No mention was made in the logbooks as to the status of the P-Mag SBs.

The fuel pump inlet and outlet fittings were sealed with RTV, and upon removal from the fuel pump, it was noted that the RTV had migrated into the fuel pump. This has the potential to cause a complete fuel blockage or restriction. The throttle linkage had been lengthened by using a brass turnbuckle, and of course it was missing a jamnut!

I hate to steal an old advertising line, “but wait, there’s more.” The new owner mentioned that the heater duct was only on the right side, and he had been cold in the pilot’s seat on the way home. I pointed out that the heater outlet was on the firewall on the co-pilot’s side, and he mentioned that hot air was coming from out of the vent on the copilot’s side, but nothing was coming out of the pilot’s side. I mentioned it was an outside air vent, and should have been cold air, but he was certain it was warm air. So, I traced the duct from the vent on the copilot’s side and couldn’t believe what I found. It was connected to a flipper valve on the firewall. When activated, it was allowing engine compartment warm air into the cabin! That’s a great source for carbon monoxide poisoning.

While I was tracing the right-side duct, I looked at the pilot’s side vent and couldn’t believe it either—- there was nothing connected to it at all. It was fake, from day one, clearly, as there were no NACA ducts on the aircraft, or any other source of fresh air. I can only imagine how hot and uncomfortable that cabin must have been on warm days.

We haven’t finished looking at everything yet, since the engine teardown will take 6-8 weeks, so we still have some time. I’m hoping we have discovered the worst of it. I feel for the new owner. Flying your newly purchased airplane home, only to have it immediately grounded and incur some unexpected expenses can put a real damper on the fun factor.

BTW, I saw the prebuy report. None of what is in this column was caught or mentioned.

Checkpoints column April 2018 Kitplanes Magazine

Prebuy inspection success tips.

By

 Vic Syracuse


There’s no doubt we have a strong economy in the U.S. right now, and I certainly see it reflected in the increasing number of prebuy inspections I am asked to perform on amateur-built aircraft. A fair number of those inspections are on uncompleted kits as well, and they seem to be selling due to life changes as opposed to selling for financial reasons.

Since the run rate of “failed” inspections seems to be holding at a constant 30%, I thought I’d spend some time sharing a few ideas with you in the hopes of reducing that number. Why? Well, I really hate it when the buyer is excited about a potential airplane purchase and then walks away due to problems discovered on the inspection. Usually, both parties end up disappointed, and it takes the joy out of an activity (flying) that is supposed to be fun, especially since amateur-built aircraft are really toys for which fun is the primary purpose. Of course, the FARs tell us that they are for education and relaxation, but that is another story.

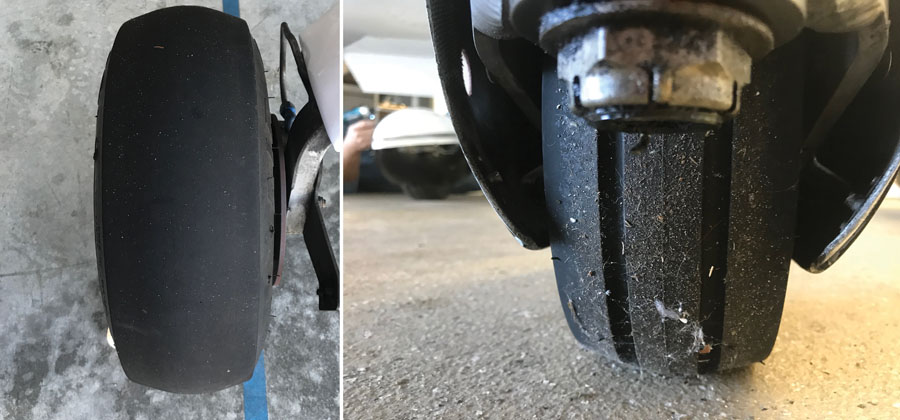
Having a tire like this bald one doesn’t give anyone any confidence in the aircraft, especially for a potential new buyer that most likely will be doing lots of takeoffs and landings initially. The new nosewheel tire presents a different picture altogether.

Logbooks and Documentation

So let’s start with the initial conversations between the buyer and the seller. The buyer should be pointed with the seller about his/her wants and desires for an airplane. If the buyer wants a solid airframe that he/she can reliably count on to fly trips, then the discussions should center around maintenance practices on the airplane. A thorough review of the logbooks should be completed, and it is during this discussion and logbook inspection that red flags can be detected early on. I have seen logbooks that have only one annual entry denoting the condition inspection was completed. Really? When I query about any other maintenance being done, I am told that yes it was done, but they’ve heard one shouldn’t make any entries in logbooks other than the required entries. While I am not a lawyer, I really think this is totally bogus advice. Personally, I think it’s better to show that maintenance was performed in the event of a mechanical failure. But that aside, it’s nice to see documentation of maintenance, if for no other reason than to understand the history of the airplane.

By the way, as an owner, take the time to make sure that you have all of the required aircraft documents available, such as the registration, airworthiness certificate, and operating limitations. In the last year alone, I have seen way too many aircraft that did not have the operating limitations, and in one case the airworthiness certificate was nowhere to be found. If you happen to be the second or third owner, take the time to ensure the documents all match each other. In one instance, a subsequent owner changed the N-number on the aircraft, but the airworthiness certificate and operating limitations still reflected the original N-number. Issuance of a new airworthiness certificate and operating limitations is a quick and easy fix that can be performed by the local FSDO.

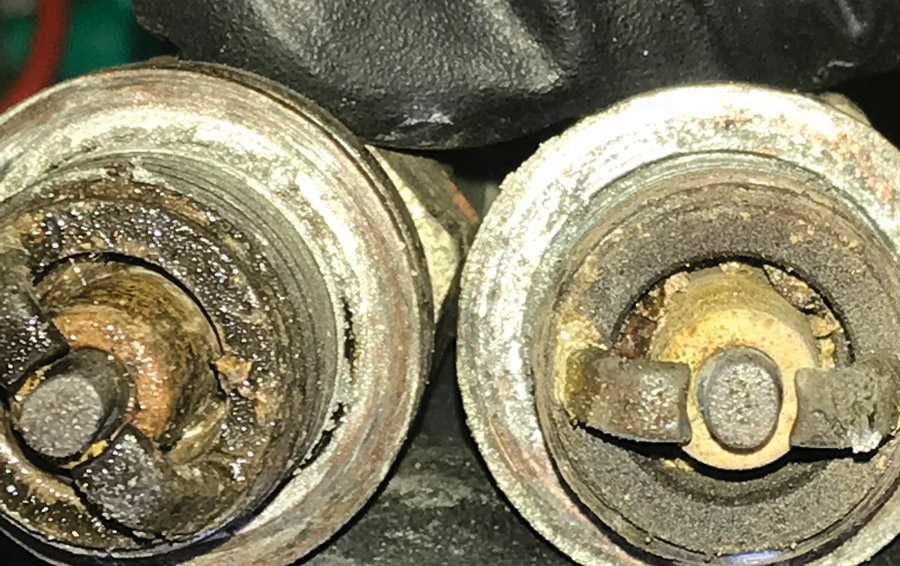
Spark plugs with this much lead in them typically haven’t been cleaned in a while. The gaps are large, and the electrodes are worn. These are easy to take care of prior to a prebuy inspection.

The other documentation that is important is the builder logs, not only for the airframe, but also for the engine, prop, and accessories. It’s good to know if the engine was built from new or if it was a local overhaul. Many engine accessories have time limits on them as well. As an example, Slick magnetos have a 500-hour service interval, and for engines with an impulse coupling on the magneto, that is a service interval that should not be overlooked.

Since we fly predominantly single-engine aircraft, the lineage of the propeller is really important. Was it new, overhauled, or ever involved in a prop strike? If there was a prop strike, was it on the current aircraft, and how was both the engine and the propeller inspected or repaired?

That being said, with scarce entries it’s hard to tell when routine maintenance was performed. Things such as spark plugs, filters, wheel bearings, hoses, brake pads, brake discs, etc., all have either life limits on them or maximum wear dimensions that should be checked. Many of the kit manufacturers, and even engine manufacturers, are very good at regularly publishing service bulletins. Some of those are minor, but sometimes they can be safety related. Things such as missing spar bolts, fuel pump and/or carburetor float bulletins are really important, and compliance with them should be well documented. The majority of buyers that I see are making the jump from certified aircraft to amateur-built aircraft, and documentation is important to them. Representing the aircraft as an Oshkosh award winner when, in reality, it has been through multiple owners and has been neglected with maintenance can be a real disappointment to the buyer when they show up. Be honest and upfront with the buyer if that is the case. Tell him/her that you’ve adjusted pricing accordingly, but do recognize some things need attention.

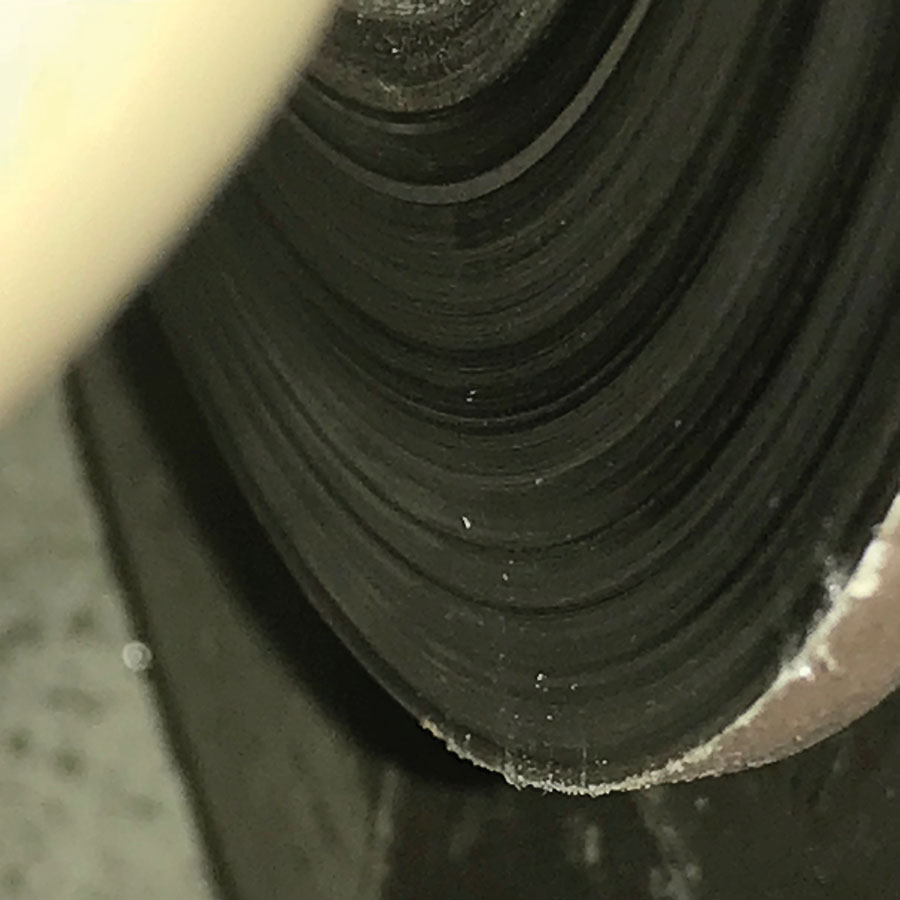
A brake disc with grooves that look like the rings of Saturn is not exactly confidence inspiring. This disc was on a 24-year-old RV and was close to exceeding the wear limits posted by the manufacturer. Grooves this deep are usually caused by the brake pads being worn down to the rivets.

First Impressions Matter

The majority of the successful inspections and sales I have been involved with all have some common threads that I’ve noticed. As with anything that is for sale, it all starts with the presentation, whether it is over the phone or in person. If the documentation is sparse or haphazard, it is usually a bad sign of things to come. One of the very first things I look at when I arrive is the organization of the hangar. It’s been my experience that if the hangar or workshop rivals a federal cleanup/hazardous waste dump project, then the airplane usually follows suit. Let’s face it, our airplanes can be dangerous toys if not properly constructed and maintained. If organization and attention to detail is not one of your strengths, you probably shouldn’t be building or maintaining an airplane. So, if you are selling, take a look around your workshop or hangar, and at least use the sale as an excuse to clean up. You may even find some parts you’ve been looking for! I’m not saying that a beautiful shop will hide an ugly airplane, but it at least gets things off to a good start.

Once you’ve got the shop cleaned up, start with the airplane. It should be clean, too, from the prop blades to the belly, and everything in between. Completing the cleanup with a coat of automotive Final Finish or equivalent can sure make a difference. You might even decide you want to keep it!

It’s disappointing to me when I see airplanes that have an engine compartment and belly that look like they haven’t been cleaned in years. Yes, many engines do normally leak some oil, but there is a distinct difference between leaking oil and accumulated grime. Interestingly enough, we sign off the condition inspection as in accordance with FAR part 43, which says the engine should be washed down each year. More than a few of the aircraft I have seen clearly hadn’t had that done. It’s very easy to tell which airplanes have had proper inspections and the right amount of TLC.

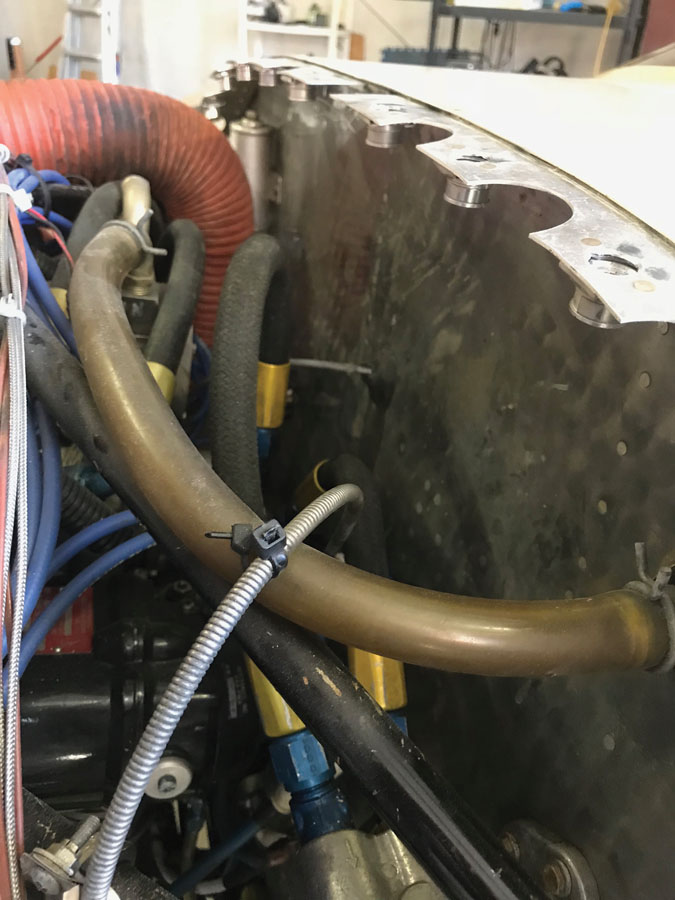
Hoses in the engine compartment should be checked for aging and brittleness. In this case, what looked to be the original vacuum line hose was over 24 years old and very brittle.

Tell the Truth

Don’t exaggerate any characteristics of the airplane because the discrepancies will be ferreted out by any reasonable inspection. Most recently, I had a seller tell me the spark plugs were in great shape and he never had any lead fouling. When I removed the lower plugs to perform a compression check, I discovered two different types of plugs, and there was so much lead and oil in them that they may have fouled on the next flight. When I asked what’s up with the two different plug types, the answer was that he hadn’t seen them and didn’t know why, yet it was his signature in the book for the last four condition inspections.

As a seller, you might consider performing a compression inspection yourself prior to the visit. It could save everyone from a bad experience. On a recent compression test that was reading 28/80 pounds, I discovered a burned valve clearly visible through the borescope. The air hissing out of the exhaust pipe during the compression test was a sure sign there was a potential valve problem, and we could have held off on the trip if it had been discovered ahead of time.

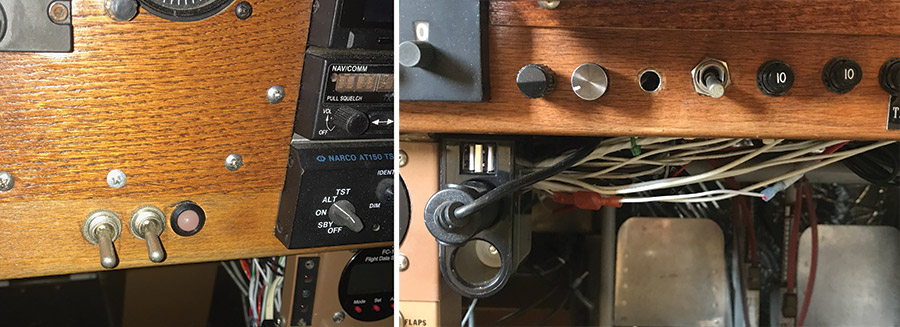
This particular airplane had just about one of everything unlabeled: switches, light, knobs, and circuit breakers! It was represented as an Oshkosh award winner, which it certainly was at one time. Even the wiring hanging down shows years of multiple owners and neglect.

While checking things over in the engine compartment, pay attention to life-limited items, such as hoses and magnetos. I’ve been seeing way too many airplanes that were built in the ’80s and ’90s that still have the original fuel and oil line hoses!

Tires and brakes are another area that gets neglected way too often. Many times it can be attributed to the tight-fitting wheel pants that really need to be removed for a thorough inspection. But whatever the reason, inspecting them prior to a sale should be paramount. So why do you think tires and brakes can be a factor? Well, think about it. What does every new owner of an airplane want to do first? Takeoffs and landings, of course, followed by rides with friends and family! So the last thing they want to do is to be saddled with replacing tires and brakes right away when they get home. So, be a good seller and take that item off of the table. I am not telling you as a seller that everything should be like new on the airplane. I am just recommending that the things that could play an emotional factor in the buying decision should be addressed. Wear and/or maintenance items that could impact the new owner’s enjoyment will play a role unless the buyer is looking for a project.

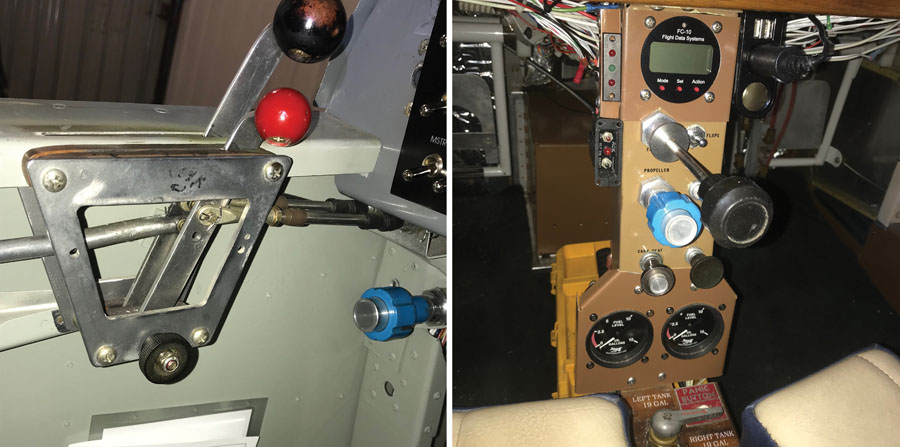
Engine controls are supposed to be labeled as to their function and operation.

Another item I find annoying is having unlabeled switches, lights, or circuit breakers in the panel. I know it’s easy to find ourselves changing things over the years that we own an airplane, and being amateur-built aircraft, anyone is allowed to work on them and make minor changes. That shouldn’t stop us from using best practices. Take the time to look at your airplane with a critical eye, from a buyer’s perspective, and most likely you will uncover some things that you didn’t notice as a builder/user. A good idea would be to download an inspection checklist from the internet on your particular airplane. Find one that you haven’t used before, as it may cause you to look at things in a different way. When you are finished, if you are the builder, you could even sign it off as a fresh condition inspection. If done properly, it will put the fun back into the sale.

The Ins and Outs of Pre-buys from KITPLANES July 2016

Dont buy a used Experimental aircraft without one (Part 1).

0

Bruce McGregor (left) looks on as Vic Syracuse inspects the engine installation of Bruce’s RV-12. The inspection for a pre-buy is almost the same as for an initial flight.

I was in the process of performing a pre-buy inspection on a high-priced RV-7 that the builder/owner had flown to my place. I think I actually felt a rise in my heart rate when I noticed that the horizontal stabilizer was not even properly bolted to the fuselage. I queried the owner about doing aerobatics and he said, “All the time!” I decided I wanted his guardian angel, and that episode, amongst others, keeps prompting me to help educate our readers with regards to pre-buy inspections. This month and next I’ll show you some insight on a methodical approach to buying an Amateur-Built airplane. I’ll even intersperse it with some stories that will make you want to laugh and cry at the same time.

Vic Syracuse inspects Bruce McGregor’s RV-12. It is really important to check the continuity of the control system, along with any known wear areas.

Why Do a Pre-buy?

It seems as though the continuing improvement in the economy has positively affected the aircraft market, and I’ve been busy doing pre-buys, especially on RV-10s. I want to share with you a sampling of the egregious things I am seeing for a couple of reasons.

First, as owners and operators of Amateur-Built aircraft, we don’t yet have a repository of information where we can all seek out service difficulty reports. While builders are usually aware of the numerous forums and type clubs, and know how to retrieve and share information on their particular model (VansAirForce.net and the Matronics email lists are two such examples in the RV world), typical second owners who are not involved in building usually are unaware of these resources. If the buyer comes from the certified world, where they are used to having an A&P take care of their airplanes, they assume the A&P will do the same for their Amateur-Built aircraft. Now a licensed mechanic in lieu of the repairman certificate holder will perform the condition inspection. However, the mechanic may not be aware of the intricacies of homebuilt aircraft. As a member of the EAA Homebuilt Aircraft Council, I can tell you that we have identified such a resource as a high-priority item and are working to create one in the near future.

The tail section can usually be a good view into the rest of the airplane. Hopefully these crooked rivets and poor edge finishing did not continue throughout the rest of the project.

Second, in a past column I mentioned that I am really an advocate of a task-based Phase I, instead of the current hours-based Phase I that we are all familiar with. These have been pioneered and proven by some of the ELSA manufacturers, with the RV-12 being a great example. I am seeing a rapid rise in the appeal of the RV-10 to the non-builder market. When compared to the cost of any new certified four-place single-engine airplane, the RV-10 is about one-third the price and has almost the same capabilities. Consequently, a number of them are being sold immediately after the 40-hour Phase I completion. These aircraft are being presented to the new buyer with some very serious problems. I know I am seeing a small cross section of the available aircraft, but of late I have been looking at airplanes all over the USA, and I am a little concerned that the deficiencies are a widespread problem.

Personally, I think signing off an airplane with known problems borders on unethical, but a bigger concern is that someone might get hurt. In the case of an aircraft like the RV-10, we are talking about families, perhaps even unsuspecting families. Not right and not fair. I am a huge advocate of Experimental aviation, but the time and place for experimenting is without passengers. Here are a few examples and some ideas for a pre-buy checklist you might be able to use.

An inspection mirror and bright flashlight can be your friend and help you see critical areas for construction quality.

Missing Fuel Pressure

One recent and very interesting phone call I received was from a new owner who said his fuel pressure was indicating zero. Upon further inquiry, he couldn’t remember when he first noticed it was missing (yes, missing), as he had just spent about 8 hours in the airplane flying it back to its new home. In the process of sitting in the airplane to understand the glass cockpit, he configured the fuel pressure to be added to the display, where it now read zero. Since this was an injected engine, I had a high degree of confidence that his fuel pressure was not really zero, as we verified the engine ran just fine at full power. He proceeded to fly to my place, and upon arrival, I quickly removed the top cowl to verify the type of fuel pressure sender. It was clearly of the 12-volt variety, and a quick check with a voltmeter verified the presence of 5 volts. Yep, 5 volts! I then checked the engine monitoring system and verified it was in fact wired to the 5-volt supply instead of the 12-volt supply. A quick rewire to the 12-volt supply and it now displayed the proper fuel pressure. A phone call to the builder confirmed that it had never worked, so he had in fact deconfigured it from the display! In my wildest dreams I cannot imagine making even one flight in an aircraft with a fuel-injected engine without the fuel pressure readings, let alone flying for 40 hours and then signing it off. Fuel pressure is a checklist item in every injected engine I have flown. I think some of us are keeping our guardian angels working overtime!

The vertical fin cap on this RV-10 stuck out over 3/8 inch and acted as a fixed trim tab. The forces in cruise were so strong that the pilot’s leg would cramp after 20 minutes.

Bad Wiring

In another case, an aircraft that had been flying for 500 hours over a six-year period exhibited some pretty serious wiring issues. The GPS steering information never presented itself to the EFIS, and the VOR/ILS information was only partial and, in fact, appeared to be reversed. The right-wing strobe light came on when the nav light switch was activated. The builder/owner said he was aware of the erroneous indications and operations, and was frustrated with them, but had learned to fly the airplane just by looking at the moving map. Quite honestly, if I hadn’t thoroughly checked the avionics as I usually do during the pre-buy inspection, it could have been very confusing for the new owner.

The vertical fin on the RV-10 and most rear spars on wings require a castellated nut and cotter key due to the movement caused by flight loads. Far too many have an AN365 stop nut.

High Oil Temperature

The last example came from a conversation with a builder/owner regarding engine-operating temperatures. The comment was made that the engine temps never go into the “red.” As most of you know, with our new glass cockpits, we can configure the temp ranges anywhere we wish. I know some people who just keep changing the numbers until the alarms go away! When asked for actual numbers on oil temps, the reply was that it usually runs 205-239F in cruise. Yikes! I know redline is 240 for this particular Lycoming engine, but is there really a difference between 239 and 240? Take a look at the tolerance on the engine sensors and you might be surprised. I politely explained that it really wasn’t operating in the normal range for the majority of his type of aircraft out there, and that he might want to take a look at it. He graciously agreed, thankfully.

Here’s an example of a misdrilled and poorly attached vertical fin, coupled with two different sizes of nuts and four washers on one bolt alone. Max should be three, or else use a shorter bolt.

The Inspection Process

One of the first things I tell every prospective buyer is that they should not get emotionally attached to any particular aircraft until we have performed the pre-buy inspection, and that they should be prepared to be disappointed. Sometimes we hit it right on the first try, but about 50% of the aircraft I inspect fail to meet expectations. While there is usually a buyer for any aircraft out there, typical non-builders coming from the certified world want an airplane they can immediately hop into and go fly, so mechanical soundness, build quality, and avionics capabilities are paramount. Most aren’t looking for a project.

Let me explain my role in this process. I make it clear that I do not accept any commissions from the buyer or the seller. I am paid for the pre-buy. I will not represent any aircraft. I wish to be the objective third party who can ensure that the aircraft is safe and is as represented. When asked, I will advise on what current market values are as observed from the completed transactions I have been involved with. Rarely do they match the posted prices in the various sales publications or web sites. I am not here to drive the price up or down, as it really makes no difference to me. However, most airplanes end up getting pretty close to a condition inspection in the process, and all owners are very appreciative and work to rectify any discrepancies, even if the current sale should fall through.

Hidden underneath the “spacer” was actually a binocular shaped hole formed from two holes drilled too closely together.

So, let’s get started. Most of my questions begin with trying to understand who actually did the initial construction, how it has been maintained and operated, how it is equipped relevant to the buyer’s needs, and has there been any damage history. If we can get past the phone conversation, we usually then try to schedule a mutually convenient time for all parties to meet. Yes, sometimes a phone conversation will determine that the aircraft will not meet the needs of the buyer, and in a couple of cases the prospective buyer was even told that it wouldn’t pass if you were bringing Vic Syracuse. While that might be good for the current buyer, I hope another buyer is just as willing to seek out real expertise prior to purchase.

Look closely and you will see two open holes on the left side. They require AN4 bolts and have been found to be missing in far too many RVs.

What do I mean by real expertise, you ask? Don’t forget that these are Experimental aircraft and are mostly built by amateurs. Even with as many airplanes as I have personally built, I still consider myself an amateur and very much capable of making mistakes. I know, as I’ve seen me do them! Just because someone has built one aircraft doesn’t qualify him or her as an expert on inspecting one built by someone else. Who’s to say his/her aircraft is built correctly? Find someone who is really experienced on the specific type and has a good reputation. Good examples are DARs, EAA technical counselors, and qualified “repeat offenders”—builders who have completed more than one project. Most, but not all, of my experience is on the Van’s and Kitfox series of aircraft, so much of my focus in this series will be centric to those, but the inspection process is applicable to most other aircraft.

The bolt into the longeron did not meet the minimum edge distance required. Van’s provided an engineering fix that should be trouble free and much stronger.

The Checklist

I am going to separate the inspection checklist into four distinct categories: airframe, engine, avionics, and logbooks/documentation. I usually start with either the engine or airframe, depending upon the builder’s experience, as well as what I’ve already gleaned from the initial phone conversation. A good place to start is at the tail. This is where most builders begin construction and develop skills used throughout the rest of the construction process. In the case of metal airplanes, it is easy to see misdrilled or improperly placed holes and overdriven rivets. On composite airplanes look for poor or sloppy layups. For tube and fabric aircraft, welding skills are really put to the test around the tight tubes and clusters in this area. Fabric covering skills are also put to the test here, with all of the sharp bends around small tubes. It is also a view into the builder’s application of best practices such as the use of torque seal on bolts and jam nuts.

Loose jam nuts on control rods are a too-common occurrence, even on airplanes that have been flying for a while. They should be tightened during final assembly and then marked with torque seal.

Review the Plans

Be sure to familiarize yourself with the aircraft plans. As an example, some aircraft in the Van’s series require a washer in the vertical stabilizer attachment on one side to offset the vertical fin. Some of the vertical fins, like on the RV-10, require the use of a castellated bolt and nut on the forward fin attach, much like the rear spar, due to the movement of these structures imposed by flight loads. About half of the ones I inspect are improperly secured. Loose jam nuts on the rod end bearings are another common finding and, in fact, have even generated a service bulletin by Van’s Aircraft. Over time the loose jam nuts will cause cracking of the flight control spars if not caught. So far my record stands at finding 12 loose jam nuts on a single airplane! Torque seal can be your friend here. If there’s no torque seal, better get the wrench out.

Don’t forget to inspect the airplane either before or after it is disassembled. This misalignment can cause cooling problems with the engine, as well as reduce power.

Check the Controls

While at the tail, it is a good time to check for complete and full control movement. Here again, I am amazed at the number of airplanes that have problems in three particular areas relative to flight controls:

  • Control surfaces that bind prior to reaching full deflection.
  • Controls that do not even reach full deflection due to improper rigging or interference, of which improperly installed autopilot servos are the biggest contributors.
  • Reversed trim, which comes to light in about 30% of the inspections for new aircraft. However, I inspected one aircraft that had been flying reversed for seven years, and the pilot stated he had just become used to it. I promptly rewired it for him on the spot, and he was very appreciative.

In a couple of cases, I actually had to argue with the builders long enough that I questioned out loud if they were really pilots. One builder tried to convince me that the stabilator trim on an RV-12 worked in reverse because it was a stabilator. Huh?

In the case of a Storm 320E, which happened to be the first kit completed in the U.S., I was uncomfortable with the five degrees of up elevator travel. Enough experience building model airplanes and real airplanes told me that five degrees just didn’t seem like enough, especially if needed to break a bad flare in this nosegear aircraft. We both agreed that a call to the manufacturer was in order, and sure enough, a more reasonable 15 degrees of up elevator was specified, requiring an adjustment of the stabilator pitch and antiservo mechanism.

Wherever a bolt is subject to rotation, it is best to use a castellated nut and cotter key, especially here at the rudder cable attach points.

Tailwheels

For taildraggers, pay particular attention to the tailwheel. It’s usually fairly easy to lift it off the ground to perform a thorough inspection and should be done regularly. Check for loose or worn wheel bearings, improper spring tension, proper lubrication, and sound structural integrity where it attaches to the fuselage. I’ve seen many center-locking tailwheels fail prematurely due to improper lubrication.

Moving Forward

From the tail, inspections usually progress to the tail cone and/or baggage area. In the past one could expect to find only ELTs and strobe power supplies behind the baggage bulkhead. It is much more complicated today. In well-equipped airplanes remote avionics such as ADS-B receivers and transponders are the norm, and sometimes they even include air conditioners and complicated battery backup systems. On top of the complexity, they are installed in areas that don’t normally receive inspections during the course of a year, and can also have an adverse impact upon the aircraft CG. It is typical for me to find loose jam nuts here, especially on the autopilot servo linkage, as well as missing safety wire or lock washers on the servo bolts. It is also important to check that the autopilot linkage does not allow an over-center position when the controls are moved throughout their full deflection. While back there, take a close look at the static system to insure it is routed properly to avoid any potential water collection.

ELTs need to be checked for proper operation (during the first 5 minutes after the hour), and the battery needs to be checked for replacement dates. The required annual logbook entry for ELT checks is the most often missed entry that I see. I see a fair number of inoperative ELTs, and in one case during a condition inspection, the ELT was discovered to be completely missing! By the way, this was on an airplane that was sold after 25 hours to a non-builder. The new owner had been unknowingly flying her newly built RV-9A all year without an operative ELT. Not cool.

Be careful to ensure that autopilot servos will not travel over center when the controls are fully deflected. One aircraft had intermittent jamming due to this condition.

Inspecting the Wings

Next, I move on to the wings. There are a couple of critical areas here, not the least of which is their attachment to the fuselage. After all, it’s not really an airplane without wings, so we might want them to stay attached! Here again, it is important to understand the designer’s intentions and directions. In the case of the RV series, so many people have forgotten to install four bolts into a particular wingroot spar location that Van’s has recognized the need for a service bulletin. And just as in the forward attach point of the RV-10 vertical stabilizer, the rear spars require the use of a drilled bolt and castellated nut due to the movement on the rear spar caused by flight loads. About 20% of the aircraft I inspect erroneously make use of fiber lock nuts here. I have come to the conclusion that by the time builders mount the wings at the airport, they are no longer referring to the plans, either due to overconfidence at that part of the journey or due to the fact that the plans were left at home during the move. Airplanes such as the RV-12 and Kitfox series, with removable wings, need to be closely inspected for proper security of the attachment hardware.

Most of you already know this, but just in case, do remember that the red nav light goes on the left wing, and the green one goes on the right wing. Yes, I inspected one airplane that had them reversed!

Flight control freedom of movement, along with the proper amount of deflection, needs to be verified. The flaps also need to be checked for proper operation, and in the case of electric flaps on the Van’s series, there is a service bulletin detailing the requirement to drill and safety wire the flap actuating motor, another often-missed item. While underneath the wings look through the inspection panels to check for corrosion, especially on airplanes that have been repainted. Sometimes the stripper can run down inside the wings and cause problems, as can Alodine when not appropriately rinsed.

While under the wing it is easy to check the pitot tube for proper mounting, and for proper operation in the case of heated pitot tubes. While having someone apply aircraft power with the pitot heat turned on, you can usually feel the tube begin to warm up. Don’t forget to turn it off quickly. I also check the landing gear while I’m already squatted on the floor for the wings. Most homebuilts, and even some certified airplanes such as the Grummans, Cirrus, and Columbias, make use of a castering nosewheel for ground steering, requiring attention in a couple of areas. Brake wear is usually high in the initial hours as the pilot gets used to the free-castering nosewheel, and the breakout force of the nosewheel needs to be properly set according to the manufacturer’s specifications. If left unchecked, brake pad wear can get to the point that it allows the actuator puck to deploy far enough out that the o-ring seal is broken, followed by loss of brake fluid and braking ability, the results of which can lead to bad consequences. It can take some discipline by the operator to regularly remove tight-fitting wheelpants in order to carefully inspect the brakes. I highly recommend this to new owners.

This pitch servo is mounted without the use of locknuts or safety wire.

Missing Cotter Keys

I’ll leave you with another sad-but-true experience with one RV-7. I noticed that neither wheel had a cotter key installed in the axle nuts. When I pointed it out the builder stated, and I quote, “We really cranked them down and have already performed our taxi tests. They aren’t going anywhere!” Yikes! Better get some new bearings on order soon.

Next time we’ll continue with the wings, engine, and paperwork.

The Ins and Outs of Pre-buys

Dont buy a used Experimental aircraft without one (Part 2).

0

I know you have all been waiting for the second part of my pre-buy article so you can run out and perform your own inspections. Based on the example of a customer who brought his RV-10 to me for a panel upgrade, I hope you will still seek out experience to help you. In this case, the customer had paid for a pre-buy and was told the wiring was fine. I removed solid copper Romex house wiring with screw splices in multiple places and ended up rewiring the entire aircraft! So, hopefully you’ve been patient with your purchase since last month and we can continue our education.

Finishing the Airframe Inspection

Continuing where we left off, the forward tank attach fittings on the Van’s series are another area that requires some attention, as they must be built to provide both some measure of safety in the event of an accident as well as security from movement during normal operations. This is accomplished by a slot in the physical attachment, along with the use of drilled-head bolts tightened into a nut plate and then safety-wired. Depending on the vintage of the aircraft, some have slots cut by the builder into fabricated aluminum attachments, and the newer ones have metal pre-stamped parts with the slot already cut. One aircraft made a strong “pop” right at takeoff (yes, very unnerving) until we discovered the forward attach fittings were loose. We were able to duplicate it on the ground.

Don’t forget to take the time to either remove the wheelpants or use a bright flashlight to look for cracks in the brackets.

Speaking of fuel tanks, many builders forget to label the caps with the type and amount of fuel.

The last things to closely inspect on the airframe are the landing gear attach points. In the case of a retractable-gear airplane, a retraction test on jacks is a definite requirement.

The flap actuator seen here, and used on many varieties of aircraft for flap and trim actuation, requires safety wire between the housing and the bolt in case the locknut should come loose.

Van’s has issued a number of service bulletins pertinent to the landing gear on various models, and it is wise to pay attention, especially if the aircraft has been routinely operated off of grass and at high gross weights, both of which can induce cracking on the engine mount weldments. A bright flashlight is our friend here.

On aircraft with bungee-cord shocks, pay attention to the age of them, as they are usually life-limited.

Deformed pitot tube. Surely we can do better than this for a device that is so critical.

Firewall Forward

Once I am satisfied we have a sound airframe, it is time to move onto the engine compartment. This is the area where the builder usually receives the least guidance from the kit provider. Many do not even know where to look for service bulletin or airworthiness directive applicability to their engine. A fair number of them do not understand that there is an oil screen on the engine, along with a fuel inlet screen on carburetors and fuel servos, that need to be checked and cleaned regularly.

Look closely and you will see a very common crack on the rear baffling that is used to support this oil cooler.

I like to understand the history of the engine before I even start looking at anything, and also inquire as to whether or not it has been on an oil analysis program, especially for an aircraft that is infrequently flown. The worst-case installation I inspected had an engine that had been removed from another aircraft and had not been run in at least 20 years, and the hoses were approximately the same vintage. This engine was installed on a high-performance Lancair aircraft, with the planned initial test flight on a 3000-foot runway. I politely persuaded the builder that it was really a risky endeavor, and it might be wiser to have the engine fully inspected or torn down prior to the first flight.

The forward tank attach actually moves, much like the rear spar, and calls for a drilled-head bolt and safety wire.

By the way, some safety advice here: Be sure to verify the ignition systems are turned off and ask when the last grounding check was performed. If unsure, assume the ignitions are hot and be very careful around the propeller arc until the spark plugs have been removed. Ask if the fuel system has been modified in any way and if it has been flow checked to exceed 150% of takeoff power.

Many builders are surprised to learn that the rear spars actually have some movement on them due to flight loads and require a castellated nut and cotter key.

Looking for Clues

Sometimes it is fun to play Dick Tracy. On one RV-10 with a nicely painted engine, I noticed that one of the bottom spark plugs was a different manufacturer than the other five. By itself this shouldn’t be a problem. Someone could have dropped a plug, and this was the available replacement. But I had to ask. The owner feigned ignorance, but upon later inspection of the logbooks, I found an entry that reflected a cylinder replacement due to damage from a hangar collapse! Interestingly enough, there weren’t any details as to cylinder break in. On the same aircraft I noticed the scat tube to the firewall cabin heat box was actually touching an unprotected area of the main fuel line. I asked if they noted any anomalies of fuel pressure during flight or ground operations, especially since they were based at an airport with an elevation of 6000 feet. Not unexpectedly, they were experiencing vapor lock unless the electric fuel pump was left on. I showed them the likely cause and how to rectify it.

A thorough inspection of the engine compartment can yield clues as to abnormal operating temps. Hotter than normal temps can usually be noticed by brittle hoses, especially the Lycoming intake hoses since they are so close to the exhaust systems. Intake gaskets can also become brittle and leak. Telltale signs are usually a blue fuel stain at the top of the intake tubes and high EGTs when the throttle is reduced for landing. The gaskets are fairly easy to replace, and I’ve had more luck with longevity using the red Superior gaskets as opposed to the original Lycoming black ones.

Never, ever use RTV around fuel or oil as it can dissolve and get into the system.

Engine Controls, Baffles, Seals, and Exhaust

A surprising number of aircraft I have inspected have less than full movement of the engine controls, with the throttle and the mixture being the highest offenders. Most of the arms on the fuel servos and/or carburetors can be drilled with a new hole to allow complete movement from stop to stop. On one particular RV-8 the owner was telling us how fast it accelerated at takeoff, and how he “really had to hold on.” I showed him he had at best 2/3 of full throttle movement on the fuel servo. This was after flying 240 hours and four years, so it was missed on multiple condition inspections. I couldn’t help but wonder if the cylinders were properly broken in, but I did tell him to expect even more acceleration on the next takeoff!

High EGTs at idle and rough idling engines can be caused by leaky intake gaskets or, as in this case, a missing bolt.

The baffles and baffle seals need to be inspected with careful attention paid in a few areas. The baffles must be sealed to the engine (high temp RTV works well here), they must form a tight seal to the upper cowling, they should be free to move between the cylinders, and they must be inspected thoroughly for cracking if they are supporting any weight such as an oil cooler. Attaching an oil cooler to the rear of the last cylinder is a common practice, but I don’t like it. It invariably will lead to cracking of the baffling and oil cooler supports. You will find all kinds of information on various forums and boards on how to add cross-members to the engine in order to support the cooler, but if you’ve ever seen some high-speed photography of cylinder movement while the engine is running you will realize the futility. Besides, I don’t really think it is good to be tying the cooler to other parts of the engine that are not moving, such as the crankcase. Picture a wet dog shaking water off. Get the idea? On the other hand, oil coolers mounted on firewalls rarely have any cracking problems. Don’t forget to inspect the upper and lower engine cowlings. Check the top cowling for signs of baffle rubbing. It will not only eventually rub through the cowling, but it is a good source of engine vibration transference to the airframe. The lower cowling, if not properly protected by heat shielding and some form of epoxy paint, will usually show signs of heat and oil damage.

This hot air duct is way too close to the unprotected part of the fuel line and, in fact, was causing vapor lock for the owners unless the electric fuel pump was left on. Better routing or fully covering the fuel line with firesleeve should help.

Exhaust systems need to be checked for proper mounting and to ensure there are no cracks, especially in welds or under heat muffs. Regular application of mouse milk on all exhaust joints is a really great preventative measure, and I apply it anytime I have the cowling off on my own aircraft. Be sure to check the exhaust nuts and gaskets at the cylinder attach points. Magnetos should be checked for proper timing and in the case of Slick magnetos, compliance with the 500-hour service bulletin.

Alternator and Engine Ground

The alternator is another item that requires some attention. Just as the engine has a very big job to do, so does the alternator. It must be capable of supplying ample power to recharge a battery after starting the engine and then continue to carry the full electrical load of the aircraft. Today’s all-glass cockpits can require steady state 25-30 amps during the daytime and rise to 40-50 amps at night with the pitot heat activated and lights illuminated. It is important to have the proper size wire with very secure connections, along with an engine ground of the same size or larger than the starter wire. On one very nicely equipped RV-10, there was a 14 AWG wire being used as the main feed from the alternator. It was not only improperly sized, but also a potential fire hazard, as it was attached to a 60-amp alternator breaker. Clearly, the wire would have melted before the breaker could have activated.

Alternator wires should be adequate to supply the full load from the alternator. Normally an 8 AWG or 6 AWG wire will work—definitely not a 14 AWG as discovered here.

Also check the alternator belt for proper tension and any signs of wear, and the pulley for alignment with the flywheel.

Many builders forget to attach a ground wire to the engine, assuming that bolting the engine mount to the firewall takes care of that. Little do they realize that the rubber engine mounts, which help to isolate the airframe from engine vibrations, also electrically isolate the engine. Alternators will not work without a good ground, and an improperly grounded engine can also cause the instrument senders to be very inaccurate. Bad or improper grounds are usually first noticed by poor cranking during starting, the initial reaction being that the battery must be bad. The engine should be grounded to the firewall via one or more flexible cables.

Spark Plugs and Prop

Upon removing the spark plugs for a compression check, perform the usual inspection and look for worn, oily, or lead-fouled plugs. They can be indicators of improper operation such as ground leaning, and other problems such as poor sealing piston rings. I always perform the first compression test on a cold engine, as engines that are flown regularly and properly cared for will usually have compressions in the 70s. Sticky or leaking valves and rings are easier to find on a cold engine. If anything is out of the ordinary, I will then run the engine to see if the problem clears itself. If not, further investigation is warranted, and in the case of a sticking valve or continued low compression, follow-up might be immediately required.

Here is a real example of a low compression test that resulted from a sticking valve. Lots of air could be heard coming out of the exhaust pipe.

Don’t forget to check the propeller and spinner for proper mounting (regular seasonal torquing of wooden propellers is especially important), leading edge damage, and proper lubrication intervals for certain constant-speed propellers. If the assembly has been dynamically balanced, make sure the weights are still attached. The proper size and location of them should be found in the aircraft/propeller logbook. Constant-speed propellers also have a recommended TBO, and it should be checked. Sometimes it is necessary to remove the spinner to check for proper safety wire. Speaking of safety wire, there are lots of places in the engine compartment that need safety wire, and often it is missing.

Removal of the spinner disclosed this disaster waiting to happen. The forward bulkhead was severely deformed due to over-torquing of the propeller bolts on a wooden prop.

On aircraft with Rotax engines there are some inspections required for the gearbox that should be checked and recorded, and there have been numerous service bulletins regarding carb floats and fuel pumps that require compliance.

Avionics and Controls

Now it’s time to look at the avionics. While current databases aren’t actually required, it is another indicator as to whether the airplane really is flown regularly. I like to take my Michel avionics tester to pre-buys. It enables me to verify proper operation of any VOR/ILS, audio markers, com radios, and intercoms. In one case I discovered very weak volume on the com 1 audio, which was caused by a ground short on the wire to the audio panel. An improperly assembled back plate connector on the rear of the unit was the culprit.

Ever wonder why some of those engine sensors are intermittent? Here’s a good example of unsupported wiring that will eventually lead to failures.

Once in the cockpit, a thorough check, much like what is performed during a preflight runup, can highlight any problems. A potential safety area I often see in amateur-built airplanes pertains to control movement. Flight controls need to move throughout their entire range of motion without interference. I’ve seen many control sticks, especially on RV-10s, that will activate switches when moved to the full-forward position. I often wonder who performed the initial airworthiness inspection, as control stick interference should be disqualifying.

All controls and switches should be appropriately labeled. Imagine your passenger pulling this knob back just as you start your takeoff climb—yes, it was connected to the throttle.

Here’s an example of an unlabeled button potentially having serious consequences—the green button on the stick grip was the starter button.

Another problem area pertains to controls, switches, and circuit breakers that aren’t labeled. The worst one had an unlabeled starter button on the control stick. I did manage to convince the new owner to remove it before a propeller inadvertently struck someone. I managed to accidentally bump it twice myself while doing cockpit checks!

The control sticks should never have interference with anything in the cockpit. This one should never have received an airworthiness certificate in this condition.

Paperwork

From the cockpit you can begin the final stages of the inspection, and that is the paperwork. Just as in the certified world, the airworthiness certificate should be visible, and the registration card should be on board and current, as well as the weight and balance. The word “Experimental” should be visible at the entry to the cockpit, and the operating limitations should be on board as well. Too many non-builders are unaware of the requirement for the operating limitations to be in the aircraft, and others claim they have never seen them or don’t remember where they are. I point out to them that the airworthiness certificate is not valid without the operating limitations. Far too many new builders find them in their original paperwork folder instead of in the airplane. A new set can usually be acquired from the FAA in Oklahoma City if needed. Don’t forget the passenger warning label required in view of the passengers.

Next are the logbook inspections. I want to see that Phase I was appropriately signed off (the proper wording is in the aircraft operating limitations), and I want to know who did the flight testing and what exactly was done. I inspected one aircraft that had been flying over seven years across three owners and never had Phase I been signed off! There have been times when I really question the thoroughness of the Phase I testing, especially including loading at different weights and CGs. Some builders have figured out that it is easier to copy VX and VY from other internet pilot operating handbooks, rather than take the time to correctly determine them for their specific aircraft.

While in the logbooks, other entries should include the required transponder and static checks, a check for completion of any applicable service bulletins or ADs, and any notated repairs from damage. Also, check for any major changes that perhaps should have required the aircraft to go back into Phase I. As an example, the requirement to notify the FSDO when changing from a fixed-pitch propeller to a constant-speed propeller is one that is often overlooked.

Flight Test

Once I’ve determined that the aircraft is in a safe, legal, and airworthy condition, it is time for a flight test. I like to watch the owner operate it as it gives me real insight as to the owner’s confidence with the aircraft. I can also spend more time focusing on the engine and flight instrumentation to verify proper operation. Engines should run within normal operating temps as per the manufacturer of the engine, so it is a good idea to familiarize yourself with those specifications prior to the flight. Engines that reach maximum operating temps within a few thousand feet of the ground probably do not stand a good chance of reaching TBO. Flight controls and trim should be approximately neutral in cruise flight depending upon CG and loading, and there should be no required adverse control inputs required when flaps are deployed. One RV-10 that had flown for over 80 hours required so much right rudder pressure in cruise flight that my leg was actually cramping after 20 minutes. I eventually determined that the cap on the vertical stabilizer was offset 3/8 inch and was acting as a fixed trim tab. Removal and replacement with proper alignment fixed the problem.

Listen for changing engine/prop vibrations at various rpm, and verify accuracy of the aircraft tachometer with an optical tachometer from the cockpit. This is especially important on aircraft equipped with propellers that have restricted rpm ranges. Don’t forget to check the radios for clarity and functionality. I like to turn the radio squelch off to check for any ignition noise. On well-equipped airplanes I will verify that an autopilot-coupled approach really does work as expected.

So there you have it. By following this guide to purchasing an Amateur-Built aircraft, you should feel confident that there shouldn’t be any major surprises soon after you bring it home.