Condition Inspections
Vic has crossed the 70 year old threshold and now only wrenches on his own airplanes.
CONDITION INSPECTIONS FOR AMATEUR-BUILT AIRCRAFT
Base Leg Aviation has been THE trusted source for condition inspections on Van’s RV aircraft. Vic is focused on sharing the knowledge he has acquired across a broader base, through columns, webinars and the recently published Maintenance Handbook for Van’s RVs.This book is a great reference guide for inspections throughout the year. It provides 443 pictures and a step-by step walkthrough of the systems in your aircraft. Problems are highlighted and the solutions presented.
See our website for purchase options. https://baselegaviation.com/store/

All Amateur Built aircraft require a Condition Inspection IAW the scope and detail of Appendix D to FAR part 43. This can either be performed by the person who holds the Repairman Certificate or an A&P. Sometimes it’s good just to have someone else with experience look over the aircraft for the first Condition Inspection, as they have probably seen the potential problem areas or wear items.
When you build your airplane you can apply for a Repairman’s certificate, which means you can now perform the Condition Inspection, an annual requirement. However, many First-time builders now realize they are also First-time mechanics. It is really worthwhile to have a person experienced in your particular type of aircraft look over your shoulder once in a while, or even take it to an experienced shop. Identifying the known problem areas or high wear areas and performing preventative maintenance can go a longs ways towards improving the safety and reliability of your aircraft.
See this webinar that was presented by Vic via the EAA on RV Maintenance Gotchas:
See this webinar that was presented by Vic via the EAA on Amateur-Built Condition Inspections:
See this webinar that was presented by Vic via the EAA on
Maintenance on Amateur-Built Aircraft
Condition Inspection article by Vic Syracuse from Kitplanes
The Condition Inspection should be to the same detail as the original Airworthiness Inspection, except for the mountain of paperwork, of course! The objective is certainly the same: ensuring the aircraft is in a Condition for safe operation. It is required to be performed within the preceding 12 months. So why don’t we call it an Annual inspection like in the certified world? Since we could debate that for a long time I defer to Shakespeare’s comment: “that which we call a rose by any other name would smell as sweet.” Again, our goal is to determine the “Condition” of the aircraft and the way to do that is to inspect the aircraft IAW the scope and detail of appendix D to FAR 43.
In the Amateur-Built Aircraft arena there are 2 people authorized to perform the Condition Inspection: the holder of the Repairman’s Certificate or a licensed A&P mechanic. The Repairman Certificate is normally issued to the builder of the aircraft and is only pertinent to one aircraft. If you build more than one airplane, you will have to apply for the Repairman’s Certificate for each aircraft. For clarity, the Repairman’s certificate is ONLY required to sign off the Condition Inspection. Anyone can perform any kind of work on the aircraft during the year. This is quite different than the certified world where the owner’s limitation to perform work is clearly defined in FAR 43.
There are 3 ways to accomplish this inspection: owner-builder performed, owner-assisted, or shop-performed. I know I enjoy performing the non-builder inspections when the owner is involved, especially for the first Condition inspection after the initial purchase. It really gives the new owner a detailed look into the aircraft and helps them understand it better. (Unfortunately, insurance requirements now prohibit owner-assisted inspections in our shop)(In a future article I plan to write about systems knowledge). It is also a great time to understand the wear items on a particular aircraft. As much as we would like to think that the 8000 flying Van’s aircraft are all alike, they are not. Every single one of them is individually built, and even multiple aircraft built by the same individual have differences. For those of you who are non-builder owners, I highly recommend that you find an A&P that is familiar with your type of aircraft.
An aircraft undergoing a Condition Inspection will probably not look much different that one undergoing an Initial Airworthiness inspection, meaning all exterior panels should be open or off, the cowling, wheel pants (if installed), and even the spinner is off, and the interior is removed enough so that the entire control system can be inspected. I would certainly recommend using a checklist, and there are plenty of examples online if you don’t have one.
Now the fun begins. For me, it’s like being on an egg hunt and seeing what I can find. I first review the logbooks to see what insights the history might yield, such as details to maintenance performed, what’s changed (any new equipment installed) and Service Bulletin compliance, and see if it is on an oil analysis program. Then I begin the inspection, which for me is to physically touch everything that moves (controls, jam nuts, governors, wheels, etc.) and look and listen for any anomalies.
Some things are not subjective here, such as really low Cylinder compression, metal in the filter or screen, and hoses that are 38 years old. Yes, I recently performed an inspection on an aircraft on which the hoses to and from the oil cooler were date-stamped 3Q76! Seeing as the aircraft was built in 1998, I’d be willing to bet they were installed with the engine as removed from another aircraft. Unless hoses are the newer Aeroquip Teflon-lined hoses, 8-10 years should be an absolute max. BTW, further inspection of this particular engine revealed some interesting data. It was an original O-320 (no dash number!), and 2 cylinders had been replaced due to leaking exhaust valves. A compression check showed 20/80 on a cylinder that had not yet been replaced, glitter-like particles in the oil, and gobs of metal in the oil filter. After some discussion, I ended up completely replacing everything forward of the firewall, and the new owner is quite pleased. Although the airframe was aged, it was meticulously constructed by a repeat show-quality builder, and with the new engine and accessories it now has a new lease on life!
Sometimes I discover the root cause of other problems. I had one RV-6 that needed the belly skin replaced due to an off-runway excursion during a crosswind landing. The subsequent entanglement with a runway light had left an unsightly crease down the belly skin. While performing the rest of the inspection I noticed that the rudder would move from stop to stop without engaging the tail wheel steering arm. The pin and linkage arm were worn beyond limits, effectively leaving the pilot without tail wheel steering unless there was adequate airflow across the rudder. The reaction to the off-runway excursion was an immediate “chop the power” which actually compounded the situation. The pilot was now just along for the ride. I know some of you are thinking it should have been caught on the preflight, and I agree. But many non-builders unfortunately don’t really understand how it all works, and if it was sold in that condition one could assume it was normal operation. Sometimes these wear items just slowly reach their limits and one day it just doesn’t start due to worn plugs, or unfortunately, something worse like no tail wheel steering when it is really needed.
Here are some other common areas to be looked at on Condition Inspections:
Gascolator screens, carburetor/fuel servo inlet screens, and fuel filters. Sometime the fuel filters are tucked away and the non-builder isn’t even aware of them. Gascolators have screens that need to be checked and they aren’t always easy to get out. I have seen screens that are 90% blocked and most likely would not have allowed enough fuel flow for full power.
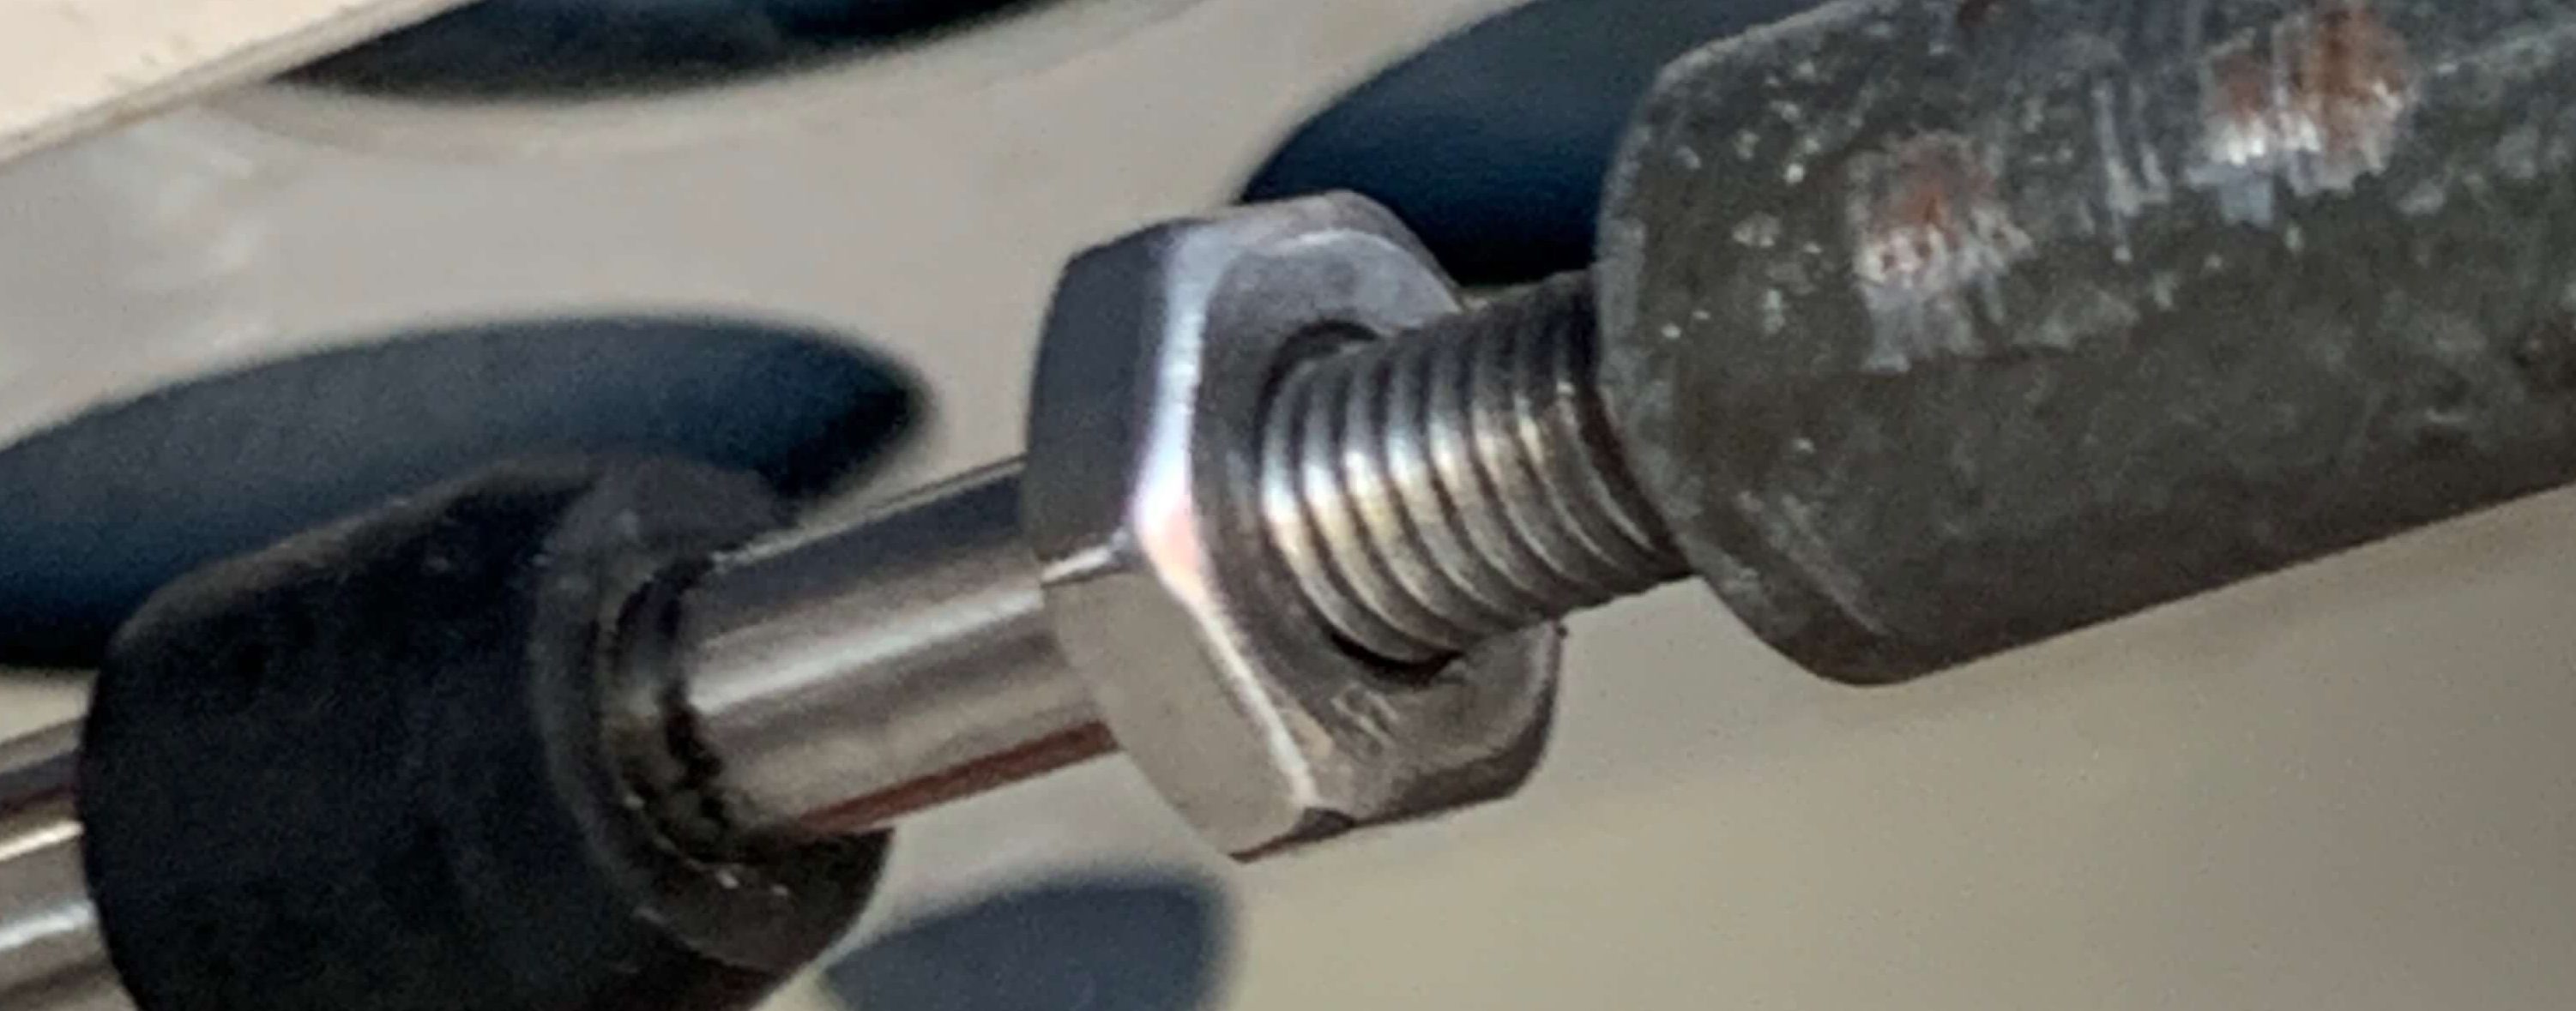
Loose jam nuts on control linkages and rod-end bearings. This has become such a problem on RV’s that cracking is occurring on elevator spars and Van’s has issued a Service Bulletin to address it.
Service Bulletins not complied with. I know there are some who will argue all day long as to whether we need to comply with them in the Experimental world, but suffice it to say that I do require them. If someone with enough view and knowledge of 8000 flying aircraft has decided that a particular item should be addressed, I will defer to their judgment. And I assure you I am not a “follower.” Remember: Condition for safe operation.
Missing cotter keys and or safety wire. I really don’t understand how they “fall out.” I really think someone was probably doing some maintenance and forgot to reinstall the cotter key/safety wire when they finished.
Wheel pants brackets really require some extra scrutiny, especially for aircraft that are routinely operated off of grass or unimproved runways.
Most Oil Quick Drains have O-rings in them that if not changed regularly will seep and cause a mess in the engine compartment.
I also ask the owner to bring a list of squawk items, which sometimes have some interesting problems. Egg hunt, remember? I had one RV-10 recently that the customer complained was eating batteries. He was on his third battery in 2 years. The symptoms were that it would start OK if used weekly, but would require a jump start if not flown for 2-3 weeks. Sure sounded like a parasitic drain to me, and sure enough an amp meter yielded 40ma of current drain from the battery with the Master switch off. It took a little while to find it, but it turns out the new 406 MHZ ELT’s require a battery connection, presumably for the circuit board in them that receives GPS information from the aircraft. And guess what? The current draw is right around 40ma! However, it should be on the cold side of the battery contactor. When queried, the owner realized that this problem did start when the ELT was installed a couple of years ago. Remember to check for changes.
Condition inspections have one other thing in common with the Initial Airworthiness inspection, and that is the paperwork. Since we started with the paperwork, we will end with it. The Special Airworthiness Certificate specifically states that the Operating Limitations are a part of the certificate. They must be carried in the airplane at all times. I try to help in this area by reminding everyone that a modified AROW mnemonic, which we memorized when learning to fly, is still applicable:
Airworthiness Certificate
Registration
Operating Limitations
Weight and Balance
The Condition inspection gets closed out with a logbook entry stating that the Aircraft is in a condition for safe operation. Most of the newer Operating Limitations actually have the recommended verbiage.
Maintenance Article from Checkpoints Column in KitPlanes by Vic Syracuse
A number of readers and customers have asked me to share some thoughts on aircraft maintenance, so in the next few columns I am going to discuss this topic based upon my experiences. Not everyone who purchases an Amateur-Built aircraft understands that they are permitted to perform any and all maintenance on their aircraft during the course of the year. The only caveat is that only the holder of the repairman certificate for that particular aircraft, or a licensed A&P mechanic, must perform the condition inspection. In the certified aircraft world, FAR Part 43 very clearly spells out the limited amount of maintenance that an aircraft owner/operator can perform, and this is usually the circle of reference for the new owner if this is their first foray into the Amateur-Built aircraft world.
My opinion is that if you are the least bit mechanically inclined, you should take the time to get to know the inside of your aircraft as well as the outside, within reason. With the vast amount of knowledge so quickly available via the internet, and especially YouTube, it is very easy to “learn by seeing” before actually attempting the task yourself. Plus, with so many EAA chapters around, there is a vast pool of resources just an email or phone call away, so why not take advantage of them? Chances are you will only improve upon your safety with regards to flying.
Take a close look and you will see that the rudder cable is actually chafing the aluminum tube. It had almost cut a hole in the tube and was fraying the cable by the time it was discovered.
There was a time not too long ago when most Amateur-Built aircraft took quite a while to build, and once completed they tended to stay with the original builder for a while. Just a generation ago, most homebuilt aircraft required a large variety of skills, from welding to riveting, along with engine and systems knowledge. Sometimes a good portion of time was even spent constructing jigs prior to actually building airplane parts and structures. Contrast that with today’s kits that never require any welding, have all of the holes match-drilled, which precludes any jig building, and they even include prefabricated wiring harnesses! Personally, I believe it has been a real win for everyone, and I also know there has been the commensurate positive impact upon safety.
Another positive result is that the completion rate has gone up dramatically in the last decade. However, I think a large number of builders realize that building is a lot of fun, and it truly can be educational and relaxing. Some find they really miss the fabrication process and part with their aircraft earlier than anticipated so they can start building again.
Don’t forget to check that all items requiring safety wire do in fact have it installed. This is not a staged picture; the oil filter was never safety-wired.
There’s a saying, “boys and their toys,” that is very prevalent in the new generation of Amateur-Built aircraft, and I am just as guilty. The last generation airplanes were certainly much simpler, usually just full of the necessary steam gauges for the engine and a radio or transponder if really needed, as opposed to today’s full-glass cockpits, weather, and entertainment systems. Usually by the time they were sold, they had flown a few years or longer, and the owners had worked out any of the operational bugs and corrected any of the wear areas. With today’s fully equipped panels and systems, I think it is really hard to completely work through all of the systems in the required 40 hours.
With regards to the airplanes I have built, I have had one really hard and fast rule: Don’t trust the aircraft until it has acquired at least 100 hours, and after that, continue to keep a cautious eye. I’ve been involved in a number of sales right at the 40-hour mark via a pre-buy inspection, and having flown a number of them back home with the new owner, I can assure you that many of the bugs and wear items were not completely worked through on every single one of them.
The cowling pieces can sometimes give you clues as to the location of leaks and pending failures. This telltale oil spray pattern points very clearly to an impending nose seal failure.
The First 100 Hours
Let’s get started by talking about maintenance during the first 100 hours as a starting point. I’ve always made it a practice to make sure the cowling comes off after the first flight, performed an oil change at 10 hours, and then usually another oil change at 25 and 50 hours. You can’t have the cowling off too much during the Phase I test program. If you are a new non-builder owner and purchased the airplane right after the Phase I completion, I recommend that you and your trusted mechanic remove the cowling and do a very thorough inspection of the entire engine compartment. If the time is close to an oil change, such as changing away from mineral oil, then do that now and consider putting the engine on a regular oil analysis program. Starting early is a much better way to gain some trending data.
The spark plugs should also be removed, cleaned, and gapped. Carefully looking at the spark plugs will give you some insight as to the operation of the engine (lead deposits, color of insulator, etc.), as well as to the health of the engine (oil on plugs, etc.). Other than that, this is not a time to be tearing into systems in the engine compartment, but rather looking very close and verifying the security of each system, especially those that were installed by the builder, such as hoses, control cables, pressure and flow senders, etc. This is where the use of torque seal will really pay off if you used it. A quick glance at all jam nuts, AN nuts and bolts will reveal any movement by a broken torque seal. If you didn’t use it, then you really need to physically touch each and every fitting with a wrench to verify they are still properly torqued. It is also a very good time to inspect all of the engine controls to verify that they have complete and full travel from stop to stop. I am amazed at the number of airplanes I inspect that have incomplete throttle and mixture travel, some of which are the contributing factors to hot-running engines.
This turnbuckle had no safety wire or locking pins and was on an airplane this way for many years.
The 40-hour mark is also a good time to take a close look at the cowling itself. Removing the cowling and setting it aside without a close examination may fail to yield clues to various problems. Airframe vibrations can come from many sources, but one overlooked area is the cowling chafing against the aluminum baffling or exhaust pipes, which will leave telltale marks on the cowling. Oil leaks can be spotted more readily on the cowling, although sometimes their source can be quite frustrating to find. And usually the rubber or silicone cowl baffle material is beginning to leave marks by this time, which will help show whether you have a good seal around the upper cowling, or have leaks in places.
Clearly there is too much cord showing on this tire to safely make another flight, as the author discovered for himself while landing on a grass runway.
This is also the time to check that the bolts holding the intake tubes to the cylinders are still tight (I have seen airplanes with these bolts completely missing) and to also check the exhaust gaskets for leaks. Leaking exhaust gaskets will leave a telltale sign of whitish-looking residue if you are running 100LL. Also, check that the nuts holding the exhaust stacks to the cylinders are properly torqued. Leaking intake gaskets will usually leave a telltale blue stain from 100LL around the gasket and running down the intake tube.
All hoses should be checked for any rubbing or interference, as well as leaks and deformations. In the case of a newly purchased aircraft, do check the hoses for date codes. Most recently I inspected an airplane built in 2010 that had a 1969 date code on the hose going to the oil cooler! Also visually check that all items requiring safety wire were done, and the wire is still in place.
A good and thorough inspection of the engine compartment will take the better part of an hour or two. Don’t rush it. Be methodical, and do each system independently. In other words, inspect the intake system in its entirety, and then move on to the exhaust system, and then on to controls, etc. It’s so easy to take pictures with our phones today that you should make it a practice. That way over time, you can see how things wear and change.
Other Considerations
At this point in the life of the airplane, I personally feel there are only a couple of other systems that really need close scrutiny if the original certification was done by a conscientious DAR or FSDO inspector. I say that because there are a lot of moving parts with jam nuts and other fasteners beneath the skins and behind panels that are most likely still tight if they were really inspected 40 hours ago. If it was just a “paperwork” inspection, then I wouldn’t trust it. As an example, most everyone knows that one of my most-discovered items on initial airworthiness inspections are loose jam nuts. I almost always find some. And now everyone is determined to have them all tight. Great. But I still check, and just this past weekend I inspected a meticulously built RV-10 that had a loose jam nut on the autopilot pitch control arm, which is behind the baggage compartment bulkhead. The builder was flabbergasted because he was certain he had them all tight. By the way, on this same aircraft neither the throttle or mixture went all the way to the stops, having almost a 1/8-inch gap at full throw. That’s really hard on a new engine, not running full rich.
So, if it was a thorough inspection, then the remaining key areas I like to check are the fuel system filters and gascolator screens if so equipped. Usually there is junk in them from the initial build, and it’s good to get it out of there. Since new pilots and newly transitioning pilots can be hard on brakes and tires during the early hours, the wheelpants need to come off, if appropriate, and tires and brakes given a good inspection. Tight-fitting wheelpants seem to be the norm today, with properly faired gear legs and wheelpants giving us retractable-like performance without all of the weight and complexity problems. However, it does make regular inspection of the tires a lot harder. Typically, we are moving the airplane out of the hangar and are paying attention to the wings and tail to make sure we aren’t going to hit anything. We tend to forget to glance at the tires while they are rolling so as to get a good look all the way around the tire. Any cord showing through the rubber should be a reason for grounding, in my opinion. It’s not worth risking the aircraft or an accident. Most recently I had one customer ask me to come and get his RV-10 to replace the tires. Against my better judgment I took off with some cord showing and ended up getting a flat tire upon landing on a grass runway!
As for the control systems, I like to check that all bolts and nuts are tight, jam nuts are tight, and cotter keys are still in place. Also check the rudder cables for any rubbing or binding. It’s amazing how moving parts can be impacted under flight loads.
That’s enough about maintenance this month. You know how I am always saying it’s important to keep the fun factor alive. Well, I wrote this column during some downtime while at the airshow in Greenwood, South Carolina, where I and the Stearman team performed our usual formation demos. It was really hot, approaching 100 degrees. But there I was, sitting in the required FAA pre-show briefing, and guess who was sitting next to me? Patty Wagstaff! I didn’t venture a guess as to whether she was slumming or we were in the big times, but it was kind of neat to be sitting next to someone I had watched perform for a good part of my life. Somehow it didn’t seem so hot anymore!